Designer : Carlos Damian Lopez Herrero
E-mail : -
Operating voltage : 220V AC 50 Hz
Published at www.epanorama.net : 06/2008
Copyright : Pictures Carlos Damian Lopez Herrero, text www.epanorama.net
Warning: This circuit operates at potentially lethal 220V AC mains voltage. The circuit should be built and used only by people who know hot to safely work with such dangerous voltages and how to built the circuit so that it is safe to use.
General circuit operation
Solid-state light dimmers work by varying the "duty cycle" (on/off time) of the full AC voltage that is applied to the lights being controlled. For example, if the voltage is applied for only half of each AC cycle, the light bulb will appear to be much less bright than when it get the full AC voltage, because it get's less power to heat the filament. Solid-state dimmers use the brightness knob setting to determine at what point in each voltage cycle to switch the light on and off.
The exact time when the triac is triggered relative to the zero crossings of the AC power is used to determine the power level to the light bulb. When the the triac is triggered it keeps conducting until the current passing though it goes to zero (exactly at the next zero crossing if the load is purely resistive, like light bulb). By changing the phase at which you trigger the triac you change the duty cycle and therefore the brightness of the light.
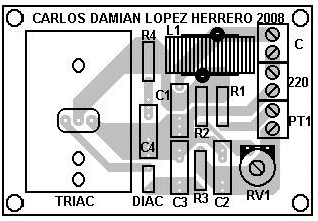
Capacitor C1 and inductor L1 make a simple radio frequency interference filter. Without it the circuit would generate quite much interference because firing of the triac in the middle of the AC phase causes fast rising current surges. The triac BT139 used in the circuit is rated for 16A continuous current when properly cooled with a large heat sink. The maximum current is less with less cooling. The components R4 and C4 for a RC nubber network that protects TRIAC from spurious triggering.
 More information on the circuit and the circuit board are available at the regulador pdf document.
E-mail : -
Operating voltage : 220V AC 50 Hz
Published at www.epanorama.net : 06/2008
Copyright : Pictures Carlos Damian Lopez Herrero, text www.epanorama.net
Warning: This circuit operates at potentially lethal 220V AC mains voltage. The circuit should be built and used only by people who know hot to safely work with such dangerous voltages and how to built the circuit so that it is safe to use.
General circuit operation
Solid-state light dimmers work by varying the "duty cycle" (on/off time) of the full AC voltage that is applied to the lights being controlled. For example, if the voltage is applied for only half of each AC cycle, the light bulb will appear to be much less bright than when it get the full AC voltage, because it get's less power to heat the filament. Solid-state dimmers use the brightness knob setting to determine at what point in each voltage cycle to switch the light on and off.
The exact time when the triac is triggered relative to the zero crossings of the AC power is used to determine the power level to the light bulb. When the the triac is triggered it keeps conducting until the current passing though it goes to zero (exactly at the next zero crossing if the load is purely resistive, like light bulb). By changing the phase at which you trigger the triac you change the duty cycle and therefore the brightness of the light.
Circuit diagram
The circuit contains a variable resistance that consists of R1 + PT1 in paralle with R2 + RV2. This variable resistance together with capacitors C1 and C2 form a delay from the mains zero crossing to the firing point of the diac. DIAC is a bidirectional trigger diode that conducts current only after its breakdown voltage (typically around 30V) has been exceeded momentarily. The larger the variable resistance feeding the capacitors, the longer it takes for the voltage across the capacitor to rise to the point where the DIAC fires turning on the triac TH1. The circuit is calibated in such way that first PT1 is turned to highest resistance values. The value of RV2 is turned in such position that the desired minumum brightness of the light bulb is reached. After this calibration the PT1 can be used to freely control the light bulb brightness at the desired control range form the maximum brightness to set minumum.Capacitor C1 and inductor L1 make a simple radio frequency interference filter. Without it the circuit would generate quite much interference because firing of the triac in the middle of the AC phase causes fast rising current surges. The triac BT139 used in the circuit is rated for 16A continuous current when properly cooled with a large heat sink. The maximum current is less with less cooling. The components R4 and C4 for a RC nubber network that protects TRIAC from spurious triggering.
Component layout
 More information on the circuit and the circuit board are available at the regulador pdf document.

Hi, What is the value of L choke? In the circuit. Please let me know. Thank you.
ReplyDelete